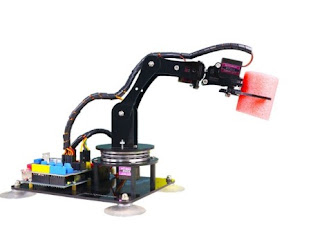
Color shorting robotic arm –
Hello everyone! Welcome to My Tech Studio, the world of DIY, where every beginner, educator or hobbyist can ideate, create, and innovate. In the previous blog, we saw the step-by-step making and circuitry of the robotic arm. We also calibrated and controlled it in real-time with a computer using PictoBlox. You can check it out by reading the blog listed above. In this blog, we will learn how to make our robotic arm autonomous in a way similar to the industrial robotic arms. Sorting of objects in industries is done by various robots with specific end effectors. Just like those robotic arms sort objects in industries, we will automate our robotic arm such that it picks up the objects in front of it and sorts them according to their colour.
Color shorting robotic arm using arduino –
We will be using an ultrasonic sensor to detect the presence of a block and an IR sensor to detect the colour of the blocks. Before moving on, don’t forget to follow to My Tech Studio to read out on more such exciting projects. Let’s begin by making 3 areas: one to lift the objects from and the other two for placing them after sorting. First, make an area of 20 cm * 10 cm, to pick up the blocks and also to house our sensors. Next, make two areas of 10 cm * 10 cm each for placing the white and black blocks. Now that the areas are made, let’s attach the sensors. Take an ultrasonic sensor and mount it to the 10 cm wall in the pickup zone using double-sided tape. Next thing is to attach the IR sensor. Now, let’s move on to the other connections. First, connect evive’s +5V and GND pins to the breadboard. Next, connect jumper wires to the sensors and extend them.

Color shorting robotic arm circuit connection –
Insert the +5V and GND pins of the ultrasonic sensor in the same columns as that of evive’s +5V and GND pins. Connect the trigger pin of ultrasonic sensor to digital pin 11 and echo pin of ultrasonic sensor to digital pin 12. Next, Insert the +5V and GND pins of the IR sensor in the same columns as that of evive’s +5V and GND pins. Then connect the signal pin with the digital pin 10. Once the connections are done, let’s write a code for it in PictoBlox.
How do you use PictoBlox?
Basically PictoBlox is a graphical programming software, which is based on Scratch blocks. If you haven’t downloaded the software yet, then download it from the link given in the description box. For creating the script, first, select evive as your board. Then, choose the appropriate serial port. Now, to create a script, we must add the robotic arm extension. Next, Switch to the upload mode. Next, make two custom blocks for initializing and using the display for the project. The script under the initialize block, will connect the servo motors to their PWM pins and then calibrate their angles. Next, set the gripper open and close angles. Set the initial angle for the rotational servo as well. Keep the gripper open and send it to the home position, the coordinates of which are (0,200,200).

Next, under the display block, add blocks for setting the text colour, background-colour, and font size. Set the cursors to monitor X, Y, and Z positions as well. We will display their values whenever we change the position along any axis. Now, let’s move on to create the main script for the Arm. It should start executing when evive starts up. First, initialize the arm and the display. Next, drag and drop the forever block to make the script run forever. Now, we need to make the arm hover over the pickup area. For finding out the values, we will use a scale to estimate the coordinates of the pickup location.
PictoBlox setup for robotic arm –
For us, they are somewhere near 0 and 150. If the value obtained from the ultrasonic sensor is less than 10, it means a block is in the area. Thus, the arm should pick it up using the gripper. Next, we’ll find out if block is whether white or black by using the IR sensor. Next, we need to find out the drop locations for the black and white blocks. In our case, the coordinates are (150, 250,150) for black and (-150, 250, 150) for white. Write these values in the white spaces in the go to block. The value is also displayed on the evive’s screen.

Once, the arm is over the desired area, it should lower down and drop the block. And that’s it. Let's upload the code to evive. You can notice that as soon as a block is inside the pickup area, the arm lowers down and picks it up. If the block is black, the arm will drop it inside this box. And if it is white, the arm would drop it inside this box. If you want, you can also add the conveyor belt mechanism to carry the objects to the pickup area.
That’s all for this blog. Hope you liked it, share the blog with your friends! Also let me know if you have any doubt regarding this project.