How can I make a Wifi repeater?
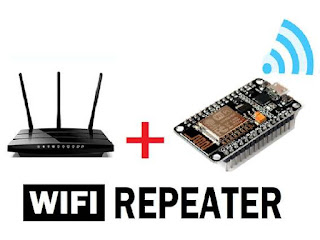
Hi there, have you ever had issues connecting to a Wi-Fi network because the signal is weak where you are worry no more in today's blog, we will look at how to use the node MCU esp8266 board as a Wi-Fi range extender come along so the first thing we have to do is download the firmware and also the tool that we need to flush the firmware so that we would go ahead and open a browser and in the browser. We'll go to the espressif website so on the espressif website to scroll down and this is the - we want the one for the esp8266 and ESP 32.
Can I use ESP8266 as Wifi repeater?
So download this based on your internet this could take a while alright so once it's done downloading go ahead and open the location of the file and then we have to extract this file all right so this is it go in here and then open the flash download. So while this is taking the time to open let's go download the firmware so for this one we go to github both links are in the description of this video so go to the Wi-Fi repeater github repo and then over here these are the files we need what we actually need is in this family folder so go ahead and just download all of the files here's a zip okay this also started downloading and it too also take a while based on your Wi-Fi strength. But anyway it's done let's open that file also and once again extract this file okay so this is also done extracting inside there are three files with a exception of this the files are hex files so you can see the 0X000050, which ends with a bin so these are all of my files all right so we just leave this as it is and then go back to the flash tool that we downloaded let's go ahead and close all these so we select developer mode and then we select esp8266 download.
This is the interface we are going to use to flash the firmware so in these trays we are going to add the firmware so go to the Browse button here and we select our firmware so the very first one was 0X00000 and then the second one is 02000 so we do select that also and would put it name there - sorry this is a 0.
How can I extend my Wifi range of ESP8266?
All right and then for the third one is an 82000 so we do that also 82X000 alright. So now that we are done with this we'll go ahead and tick these boxes and it should all light up green as its showing here if it doesn't light up like this you've done something wrong now over here we'll select 80MHz because the ESP works with 80MHz and then with the ESPE I will leave it as it is and over here we'll select 32 Mbits for the baud rate we select 115200 and then for the com port for me I have a number of compost showing up but I have not connected my ESP yet.
So I'll have to connect my ESP to see what comport it is at so on connecting it take a look at the list very well I'm going to close it and come back and then you see that there is comport-13 so that is the comfort of the ESP so select that and then from here you can just start the process and so you can see the flashing has started so during the flash you can see this little blue light here flash and also so you notice after the upload the light doesn't turn on nothing seems to be working on the board so this is what you need to do unplug your ESP board and then connect it back and this time around you realize that the light is solid it's just on doesn't blink nothing so now you go ahead and check if your network has started working. You go to your Wi-Fi settings or Wi-Fi menu and you realize that you have this new Wi-Fi that is popping called MyAP which stands for my access point.
WiFi router range extender with ESP8266 –
So you go ahead and connect to that Wi-Fi so by default it does not have a password so you will set up the password along the line so let's do that so while its trying to connect you notice this light keeps blinking okay so now it's connected but it has no internet access first of all we are going to go inside properties and set this network as a metered connection just in case our internet comes on our PC doesn't use it to do a Windows Update alright. So let's go ahead and close that, then now you can open a browser and head to the IP address on the ESP so this is what you do you enter 192.168.4.1 and press enter so this is the interface of your Wi-Fi next way on this body. Here so you set so over here we will set their Wi-Fi. We want it to connect to the already existing Wi-Fi in your house or the office or wherever you are going to be using this the Wi-Fi you want to extend you enter the Wi-Fi details so for me the name of the Wi-Fi is innovate. So innovate and the password is QWERTY 54321 right. Alright so that is the credentials of the network I want to extend and then I'll go ahead and click connect all right so after a short while we are going to check up on the Wi-Fi network ad and we go back to my AP and connects to my AP this time around looks is that my AP has internet access it doesn't show as it did the first time.
ESP8266 WiFi Repeater –
We connected to it so we go ahead again and assess the interface so this time around we have is connected to innovate with this password now we have to set this up also to have some form of encryption so we are going to change this name to innovate repeat. So we name it innovate RT and with a password let's go ahead and set it to something simple at for now 1234564321 so that's that and then we select wpa2 and then were set so you can see the innovate RT again back here but this time around it has a password so let's try connecting to it. So innovate RT and then we enter the password which is 1234564321 and then we connect to it. So we are connected to that so from here on we are accessing my main home internet network using this so we forwarded that network we've extended its range by using this so wherever I put this in my house it's going to connect to the already existing Wi-Fi and extend that using this online tool let's check the speed of our internet connection our original internet connection. So by comparing both results we can see that the network we created has a much better upload speed than a download speed while we are still connected to the RT network let's go ahead and stream something and see how well it goes so let's go to YouTube and play this video here. So we see how fluid it is it works just as our regular internet would work and all this is going to this little under $5 board here. I'm pretty sure you notice this board on the desk so this and this are practically the same this is the NodeMCU and this is the witty cloud but they have the esp8266 chip in common so they're both the same everything you see here. On the surface of this board has been moved to the other side of this board so it's practically the same thing just that it takes a different shape.


